


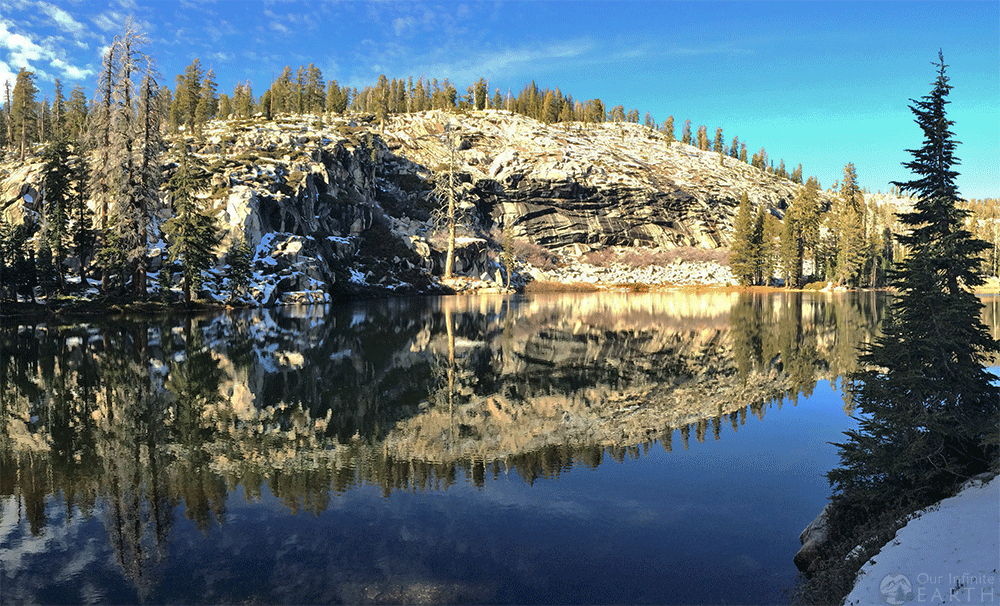
This is an absolutely beautiful hike with astounding views of the Sierra Nevada mountains. The name Jackass Lake comes from when congress sent the cavalry to patrol Yosemite National Park (which these lakes were originally part of) in the early 1880s. The cavalry used donkeys (aka jackasses) while building roads, which is where the lakes get their names. As it use to be part of the park, it’s equally as beautiful, but lucky for us, it’s far more remote and less trafficked. We didn’t encounter any other hikers on the trail. A great day hike to get away from crowds and an awesome place to go backpacking (which I intend to do on another trip!).
Overview
- Distance: 8-9 miles round trip
- Type: Out & Back
- Time: 3.5-5 hours round trip
- Elevation at trailhead: 7,000 feet
- Elevation Gain: 1,960ft- 2,580ft
- Difficulty: Moderate/Hard
- Crowd Factor: Non Existent
- Permits/Fees: No
- Water: Yes, when reaching the lake
Directions to Jackass Lake Trailhead
The trail head is very clearly marked by a large sign on the side of the road. You can’t miss it. There is a parking lot on the side of Beasore road, which is across the road from the trail head. Beware that Beasore Road isn’t well maintained. The pavement is littered with rocks, gravel, tree branches etc., and then soon devolves into patchy pavement and then a dirt road.
NOTE: This isn’t for the Norris Trail head. Norris Trail is about 3miles more on Beasore Road (the pavement gets even worse) and is not as clearly marked. It’s a shorter (6mi), easier trail (2,400 elevation gain), but harder to find.
From The South Entrance to Yosemite (near Fish Camp)
- Continue South on Route 41 for about 15 miles
- Turn left onto Rte 222/ Bass Lake Road. There will be clear signs for Bass Lake.
- After 27 miles, turn left onto Beasore Road
- Go another 27 miles down Beasore Road and the parking lot is on the right.
Use this map to get directions. It will take you roughly to the trail head:
Recommended Hiking Gear
[carousel_slide id=’1406′]
What To Expect From The Trail
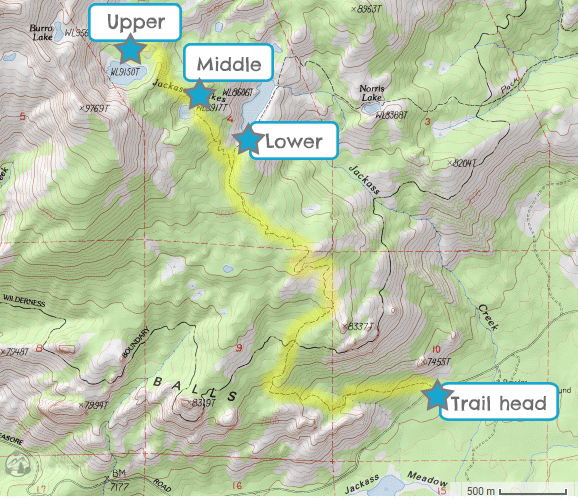
It was difficult for me to find elevation and distance information for each of the lakes separately. Most other blogs have only written about one of the lakes, but not both and the park services provide no info on the differences between the lakes, so here’s what I found to the best of my knowledge:
Lower Jackass Lake
- Distance: 8 miles round trip
- Elevation at Trailhead: 6,641 ft
- Elevation Gain: 1,960ft
- Difficulty: Moderate/Hard
- Crowd Factor: Non Existent
- Time: 3.5-5 hours round trip
Upper Jackass Lake
- Distance: Around 9 miles round trip
- Elevation Gain: Around 2,580ft
- Difficulty: Moderate/Hard
- Crowd Factor: Non Existent-Light
- Time: 4-6 hours round trip
Another blog has said about this trail: “Don’t stop at Jackass Trailhead unless you’re training to hike Mt. Whitney”. I can’t completely disagree with that. The first 250-300ft of this trail is grueling. It’s very steep and completely uphill and at 6,600ft elevation, we were often stopping to catch our breath.
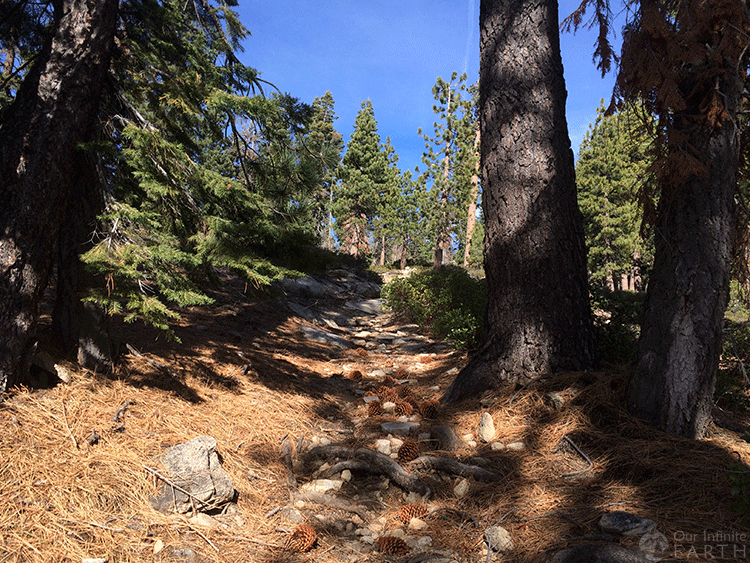
After this, the trail evens out, but only for a little bit before starting uphill again. The rest of the trail isn’t as steep as the first stretch, but it does continue almost completely uphill for the entire hike until you reach the top of the peak above you. There are several opportunities for amazing views of the surrounding mountains.
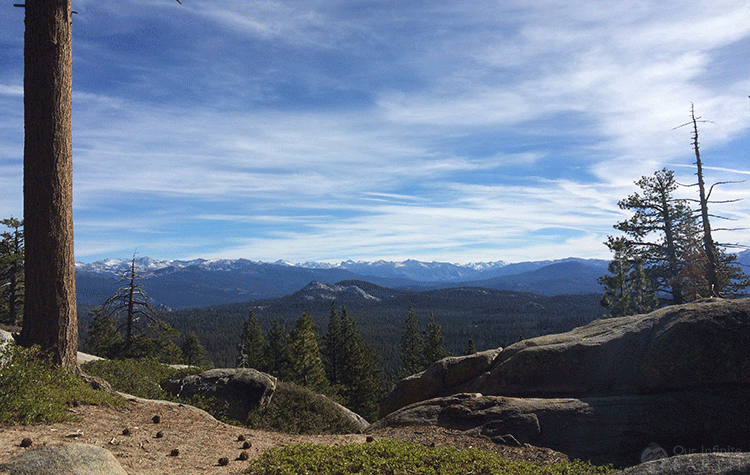
Once you reach the top of the peak. The trail disappears…I had been warned that the trail wasn’t well maintained and was hard to find in spots, but here it’s completely gone. There is a 25ft area clearing with no trees on top of the rock and there are a few trail markers but finding them is difficult and not all of them are accurate…. yes really, some of the trail markers will take you in the wrong direction. We found our way by piecing together trail markers and other signs of a trail, like logs that have been cut by chainsaws, or downed trees that look like someone used them to line the side of a trail. Even so, we lost the trail several times.
Pro Tip: Make your way North/ slight North West from this peak. You’ll see a mountain range to your left with some mist settling among them (I saw this and another blog I read saw this too):

You should be able to see another point similar to the one you just left, but this one is rockier and full of boulders rather than covered with dirt. It’s a great “typical” vista point to look over the mountain range. From here look North/ slight North East and you should see some trail markers. These trail markers are accurate and you’ll pick up the trail again here. We spent 30-45min trying to find the trail.
Here is a close up of the trail map above. I’ve highlighted in RED the part of the trail that’s missing. Hopefully this helps you to get your bearings:
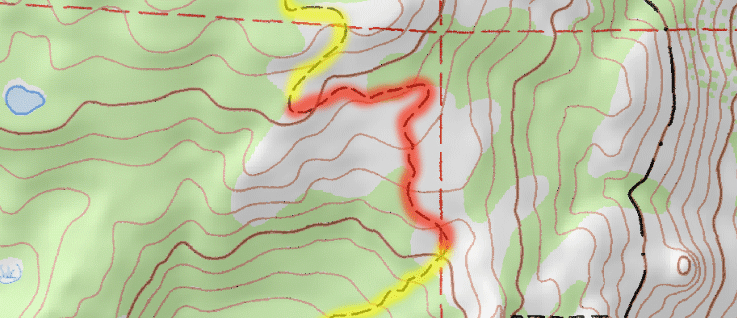
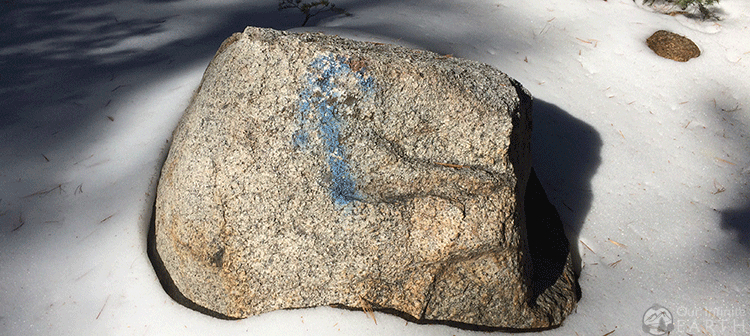
Once you pick up the trail again, the markers will disappear and be replaced with very faded blue spray painted arrows on the surrounding rocks as you travel along a rocky trail. We did this hike in late Nov. and there was a little snow, which if it was two inches higher, would have been covering the blue arrows and we wouldn’t have been able to find the trail.
Following the blue arrows will bring you to a sign that gives you the directions to get to the lower or upper lake. The lower lake is around 150-200 feet or so further, basically straight ahead and easy to find.
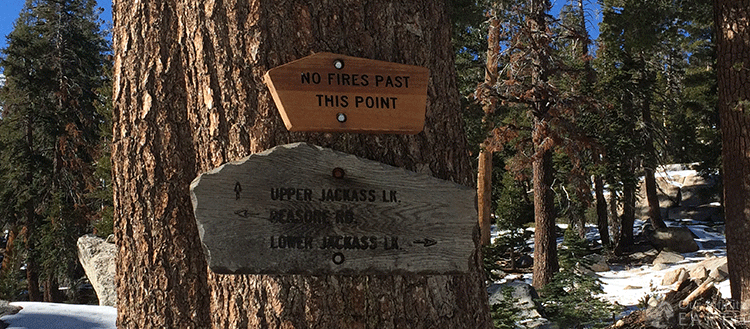
The upper lake is another half mile or so, and again here the trail disappears and is hard to find. Continue making your way North West/ North looking for markers, which will eventually bring you to the upper lake. The upper lake seems to be a more popular destination from what I can see from other blogs online, so you might encounter one or two campers there.
Hiking Vlog
Backpacking and Camping at Jackass Lakes
If backpacking at Jackass Lakes, I would recommend taking the Norris Trail rather than this trail given the first difficult section.
Permits are required to stay here overnight and are $5 per person. (Here is the permit application form.) This area is so remote however, I would be extremely surprised if a ranger was coming around to check permits. BUT, given the difficulty of finding the trail in several sections, I think getting a permit is a good idea so that someone knows you’re out there in case you get lost since there’s no cell service.
The sign that gives you directions to the upper/lower lakes also says that no campfire are permitted beyond this point. I’ve read other blogs tho that say that fires are permitted as long as they’re 200ft away from the lakes (which for the lower lake, would be right around that sign). Use your discretion and make sure your fire is contained and that you leave no trace.