


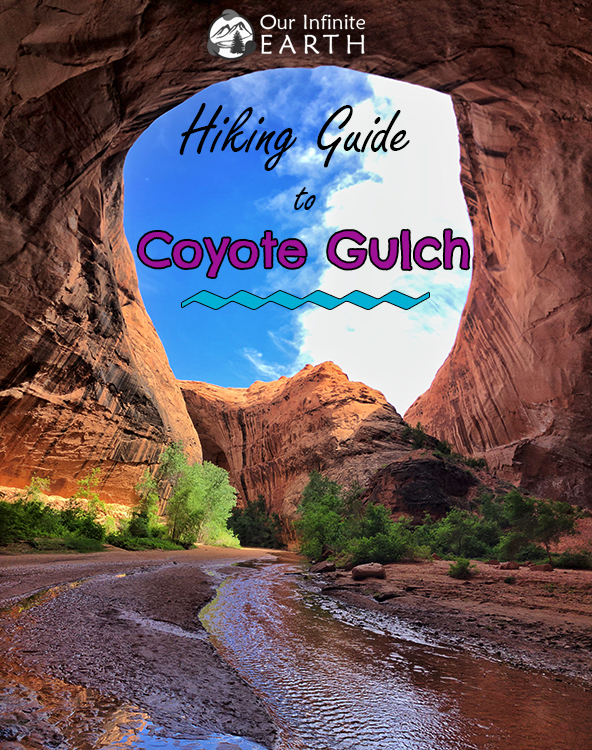
Coyote Gulch is an amazing beautiful canyon in the Grand Staircase-Escalante desert in Utah. It’s a popular destination for backpackers and day hikers due to the incredible arches, waterfalls, and petroglyphs all found within a relatively short distance. This area is best explored during an overnight backpacking trip, but can be done as one long day hike as well.
Overview:
- Distance: 5-26mi (depending on route)
- Time: 10hrs-3 Days
- Elevation at trailhead: Roughly 4,600 feet
- Elevation Gain/Loss: Roughly -1,633ft
- Difficulty: Moderate
- Crowd Factor: Moderate-High
- Best Time: March-June, Oct-Nov
- Permits: Yes, free and not competitive
- Water: Yes, freshwater seeps
Highlights
- Towering canyon walls, waterfalls & amazing arches
- Majority of attractions are located within a short distance
- Fresh water sources
Lowlights
- Crowds, especially on the weekends
- Difficulty getting into the gulch
- Bugs & heat depending on the time of year
- Lack of private campsites
A Note About Safety & Preparation
I was really surprised at the number of under-prepared hikers that were here. Maybe it was because we were here on a holiday weekend, so it brought out the worst, but it felt to me as if a good number of those hiking here had not done their research and were not properly prepared, which can really get you into trouble.
This is not an easy hike. It seemed like the backpackers understood that as every camp we saw looked well put together and maintained, but there were also several “Instagram hikers” – everything from girls with their personal photographers to a group coming in wearing flip flops with only one water bottle in their hand and 2 poofy Pomeranian dogs (even though dogs are not allowed in the canyon). As beautiful as Coyote Gulch is, this is still the American desert and things can go wrong very quickly – it’s important to be prepared and know what you’re getting into.
My impression is that this place is on the verge of becoming “Insta-famous” and will soon get overrun by people who think they can just casually stroll into the canyon real quick, take some photos and then head home if more strict permit system isn’t implemented… from what I saw, it’s already starting.
Where is Coyote Gulch Located?
Coyote Gulch is part of the Glen Canyon National Recreation Area in the Grand Staircase-Escalante desert, in south central Utah, in the western United States. It is a tributary of the Escalante River and is just outside of the town of Escalante.
It’s northeast of Bryce & Zion, and southwest of Capital Reef. It’s about 3hrs from Bryce Canyon and 5.5hrs from Moab.
When Is The Best Time To Go?
The best time to visit Coyote Gulch in general is March through May, and October through mid-November – these times have the best weather. While the gulch itself is mostly shaded due to the high canyon walls, the weather from mid-June through the end of September can be really hot reaching the 100s, and you do not want to be hiking across the desert to get there in that heat.
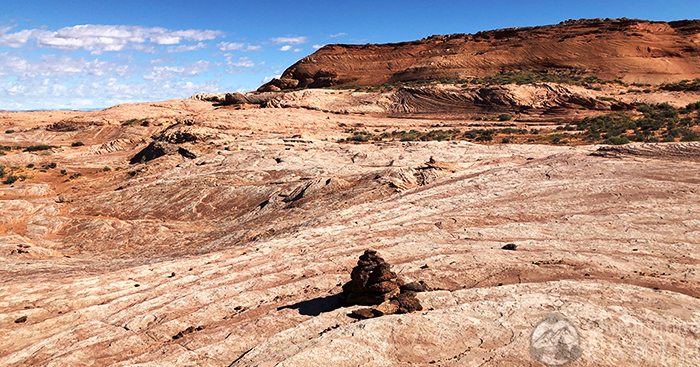
The majority of the canyon is pretty wide, but you can see in some places where the water level was previously very high. Flash-floods are a risk until early October.
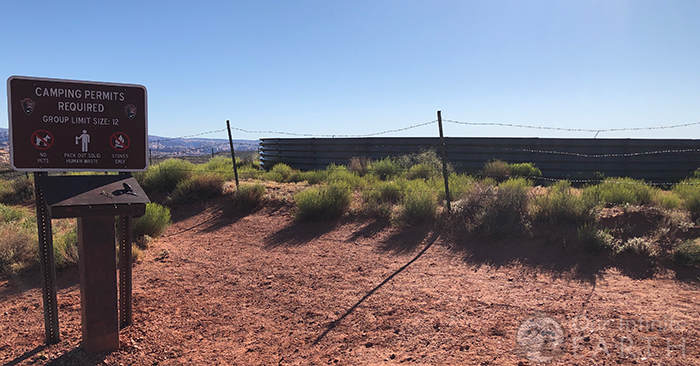
Permits
Backcountry permits are only required for overnight stays in Coyote Gulch, no permits are required for day hikes. Permits are FREE and can be gotten at the Escalante Interagency Visitor Center or at one of the entry trail heads.
The trail heads can sometimes run out of permits, so to be safe, it’s better to go to the Visitor’s center if possible. Here they will also remind you that you need to bring WAG bags and can answer any additional questions you have about your trip (such as the current condition of Hole-in-the-Rock-Road).
The permit “receipt” (one copy is for the BLM, the other is for you) should be kept with you while you are hiking in Coyote Gulch. The woman at the Visitor’s Center mistakenly told us to leave it on the dashboard of our car, which we then had to explain to the ranger why we didn’t have our permit on us when we ran into him at the bottom of the gulch.
Human Waste Disposal – You are responsible for providing your own waste removal system (or WAG bag) that is adequate for the size of your group and the length of stay. All human waste solids must be removed from Coyote Gulch using a portable toilet or a specifically engineered bag waste containment system containing enzymes and polymers to treat human waste (you can’t just use a regular plastic or paper bag).
Fires and pets, including dogs, are not permitted.
Choosing Your Route
There are four main routes in/out of Coyote Gulch, each with their own challenges. You can use the same point as your entry/exit, or you can enter through one and exit through another (and then you will need to use a shuttle service).
The most popular routes are:
- Enter and Exit at “sneaker route”/water tank route (especially if doing this in one day)
- Enter at Crack In The Wall, Exit at the Water Tank
- Enter at the Water Tank, Exit at Hurricane Wash
- Enter and Exit at Hurricane Wash
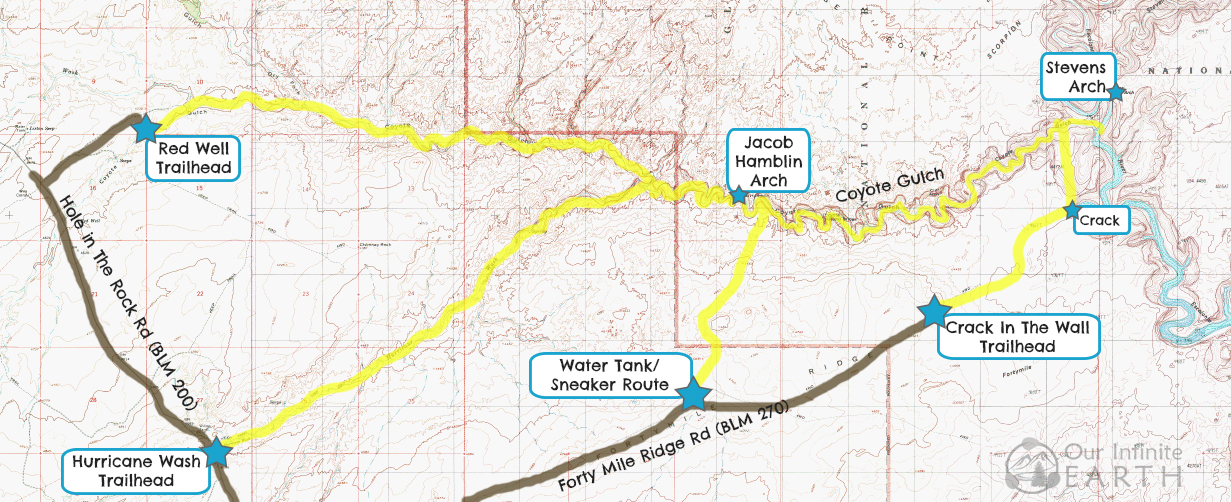
Interactive map available here.
The Road to The Trail Heads
All of the possible entrances to Coyote Gulch are off of “the road” – which is Hole-in-the-Rock Road, also known as BLM 200, which is off of State Highway 12 about 5 miles from Escalante. If you want to visit Coyote Gulch, you will have to take this road. It’s a long and wide road through the desert that is maintained by a Caterpillar, which means it’s gonna get bumpy! Also make sure to watch out for cows on the road!
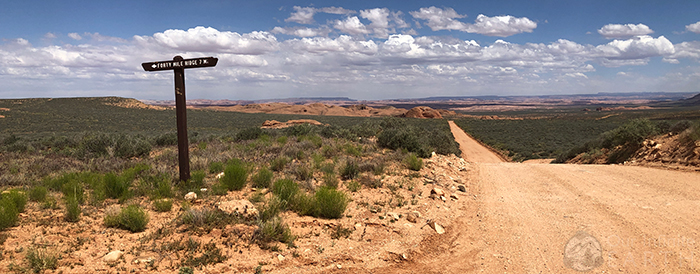
It’s recommended that you have 4WD and a high clearance vehicle (at least 8″) to travel this road. The majority of the vehicles we saw where trucks, SUVs, and ATVs. There were several pieces of cars along the road – hub caps, bumpers, etc. In good conditions, the road isn’t bad – it’s just bumpy, but can be traveled even in a little Prius (as we did) – you just have to go slow and be careful (we averaged 20 mph).
If it rains, this road could easily become impassible – there were deep trenches along some parts of the road where other vehicles had obviously been stuck at one point. We ended up cutting our trip short by 1 night because it was going to rain the next morning and were worried about getting stuck on the way out.
Just in case, the local tow truck company Escalante Towing & Recovery is run by Heath 435-691-1943.
There are several turns you can take off of this road onto others which lead to other adventuring points of interest, all of the side roads are clearly marked with signs.
In One Day: Via The “Sneaker Route”/ Water Tank Route/ Jacob Hamblin Arch
- Distance: 2mi From the trail head parking lot to Coyote Gulch
- Recommended Trip Time: 1-3 Days
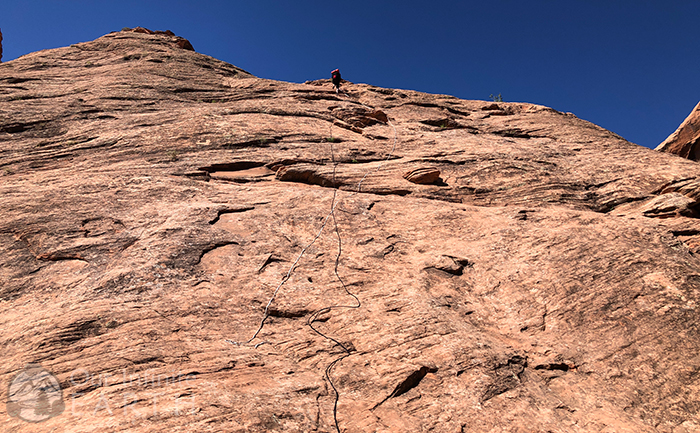
- This route requires 100+ feet of class 5 friction climbing (find out what that means here) and will require a climbing rope at minimum – harness with ascender clamp if you want to be super prepared or are scared of heights.
The is the fastest and most direct route into Coyote Gulch. If you are doing this hike in one day, this is the best route to take.
The trail head is located on FortyMile Ridge Road (also known as BLM 270). Coordinates on Google Maps Available Here.
Go 36.25 miles south on Hole-in-the-Rock Road (also known as BLM 200). Then you’ll turn left onto FortyMile Ridge (also known as BLM 270) and follow it for 4.3 miles to a parking lot up on the slight hill on the left of the road. A water tank is at the end of the parking area along with the box where you can get a permit and the start of the trail.
From here, start hiking north toward Coyote Gulch following the trail in the sand. You’ll continue to follow the sand trail as well as well marked cairns across the rocks where you can’t follow the trail through the sand anymore.
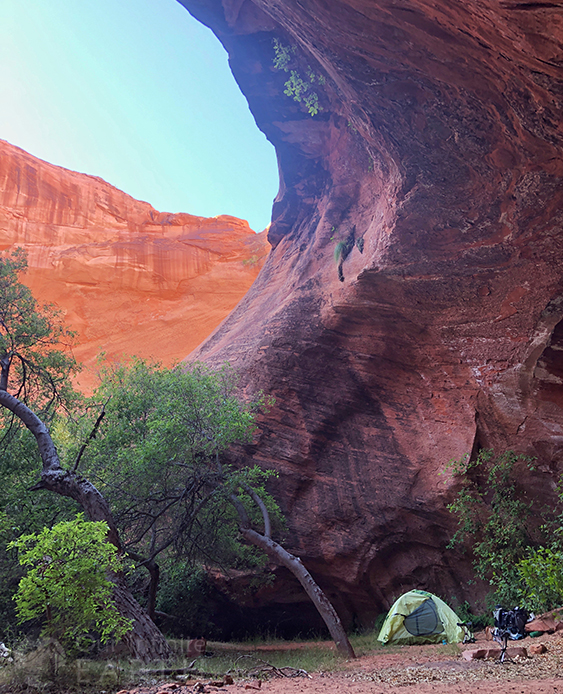
The final section of this trail is a steep decent down a roughly 60 degree angle rock face. There is a 100ft section or so where you can secure a rope through a notch in the rock to help with the decent. The area above and below the section with the rope is still very steep and there’s no additional assistance of the rope.
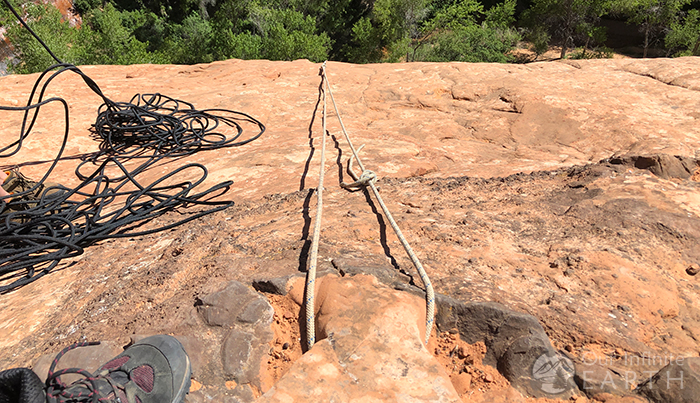
You should bring your own rope! I got a 200ft rope from Amazon for $70. These are not set up by the park service! Do not rely on someone else leaving a rope behind! 95% of the people we saw did not bring a rope. There was one old worn down rope set up when we arrived, and it was gone the next day when we left, so if we had not brought our own, there would not have been a rope set up to help with the climb out.
Via Crack In The Wall
- Distance: 2.5mi From Crack in the Wall to Coyote Gulch
- Recommended Trip Time: 1-3 Days
- This route contains a large sand dune (700 feet of elevation) that can be strenuous to climb.
Crack In The Wall is the second shortest trail into the Gulch and probably the second most popular entry point. This is route is also an option if you want to do this hike in one day.
The trail head is located at the end of FortyMile Ridge Road (also known as BLM 270). Coordinates on Google Maps Available Here.
Go 36.25 miles south on Hole-in-the-Rock Road (also known as BLM 200). Then you’ll turn left onto FortyMile Ridge (also known as BLM 270) and follow it for 6.8 miles. You’ll go past the above Water Tank/ Jacob Hamblin Arch parking lot, then stay left at the next junction and continue to head east. You’ll cross another cattle guard and then the last 2 miles of this road is through deep sand – it’s highly recommended to have a 4WD/ high clearance vehicle for this section.
The trail head starts at the north side of the parking lot. Follow the trail northeast paying attention to the cairnes that will show you the way. The trail lasts for about 2 miles until you reach the rim of the Gulch. Continue to follow the rim to the northeast.
After about a half mile, be on the look out for a 18 to 24-inch wide fissure in the sandstone fin directly in front of you. You’ll need to squeeze through this crack and shimmy your way down to the sand dunes below. This post has lots of really helpful pictures for finding the crack. Also here’s a video showing you where it is:
If backpacking, it’s recommended to walk to the east a bit and lower your backs down over the cliff with a rope and to then squeeze through the crack in the rock yourself without the pack. Once you’ve made your way through the rock, continue on to the confluence of the Escalante River and Coyote Gulch
This route can be extremely strenuous, especially in the heat. We met other hikers in the Gulch who had done this route and said that walking across the sand dunes on this route was one of the most difficult and brutal things they had ever done.
Via Hurricane Wash
- Distance: 6mi From Hurricane Wash trailhead to the Escalante River
- Recommended Trip Time: 2-3 Days
The Hurricane Wash trail head is the least strenuous entrance into the Gulch, but also adds approximately 6miles. This is not a good option if you are trying to do this hike in one day due to the distance, but this is a good option if you have kids since it’s the safest route.
The trail head is located along Hole-in-the-Rock Road (also known as BLM 270). Coordinates on Google Maps Available Here.
Follow the Hole-in-the-Rock road 33 miles to the parking area beside the road. You’ll pass a livestock corral and immediately after is a parking lot to the right. Park here and then the trail head is across the road.
Start hiking east in the dry wash toward Coyote Gulch. After about a quarter mile, you’ll find the hiker registration for overnight permits. Follow the wash as it meanders along the sandy wash bottom trail for approximately 6 miles until reaching the junction with Coyote Gulch.
Via Red Well
- Distance: 13mi From Red Well trailhead to the Escalante River
- Recommended Trip Time: 2-3 Days
The is the first trail head you’ll come to along Hole-In-The-Rock Road. It’s the longest hike to get into the Gulch and is also the least popular. Good thing about least popular means its also the least crowded.
The trail head is located along Hole-in-the-Rock Road (also known as BLM 270). Coordinates on Google Maps Available Here.
Follow the Hole-in-the-Rock road 30 miles to the sign for Red Well. Turn left onto BLM 254 and drive 1.5 miles to the trailhead where there is a big sign. This road is not graded and can have deep ruts in the road. Be prepared with your vehicle.
Follow the wash downstream towards the east over the hill. You’ll want to find paths that cut between the curves of the stream to avoid detours as well as possible bushwhacking.
Why We Chose The “Sneaker Route”/ Water Tank/ Jacob Hamblin Arch Route
With our car (a Prius), Red Well and Crack in the Wall were out of the question due to the condition of the roads to get to these trailheads. That left the Water Tank Route and Hurricane Wash.
The thought of walking 6 miles across the hat desert with no shade following a wash without much to look at didn’t sound too appealing to us, so we decided to go with the Water Tank route.
Shuttles
If you don’t want to take the same trail out and back, then you’ll either need a friend to pick you up or drop you off, or you’ll need a shuttle.
The closest town is Escalante, which is a really small town, so there aren’t many options.
- Excursions of Escalante – varies
- Utah Canyon Outdoors – $300/ group
Maps: Attractions, Campsites & Water Sources
I highly recommend downloading the free Maps.me app for this trip. While it’s hard to get lost here since you’re basically just following the river in order to see everything, the app will help you locate all of the features in the canyon. Download the Southern Utah map and save it to the app so that it can be accessed when you don’t have service. Then search for each of the attractions you want to see (they all come up in the app) and save them to a Bookmark list. When you’re in the canyon without service, the app uses GPS to show you your location in relation to the saved locations from your list and will let you know how much further you need to go.
Attractions
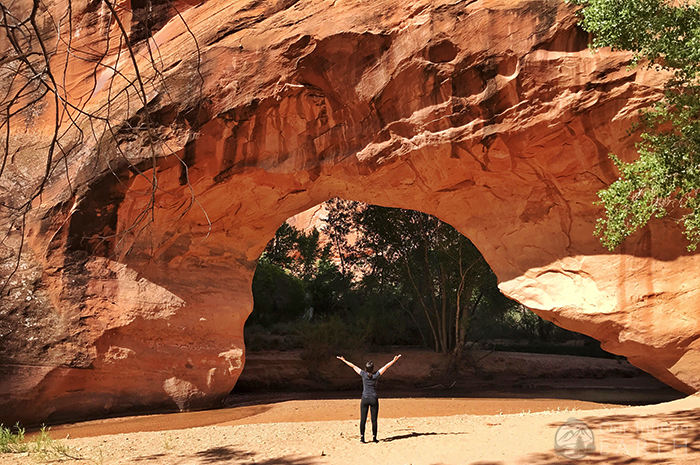
Jacob Hamblin Arch

This is the main giant arch that you’ve seen in all the photos and is probably the reason you came to Coyote Gulch. It’s massive and eerily quiet when in the alcove of the arch. If coming from Hurricane Wash, this is the first “attraction” you’re going to see. You can camp directly under the arch, though there’s no privacy and this area gets pretty crowded with people coming to look at the arch.
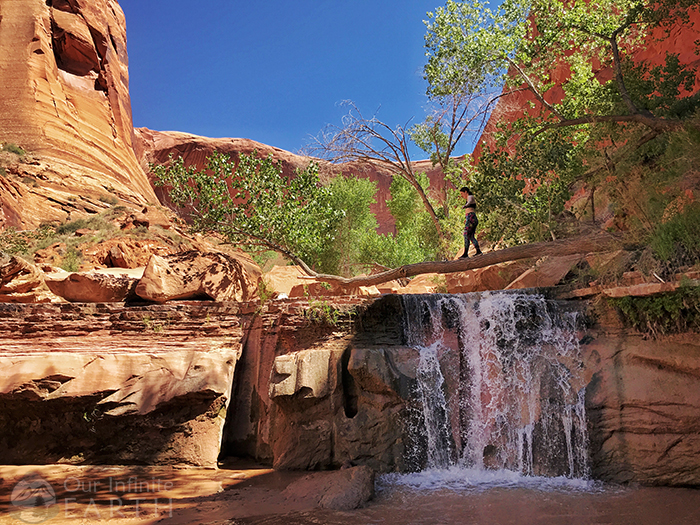
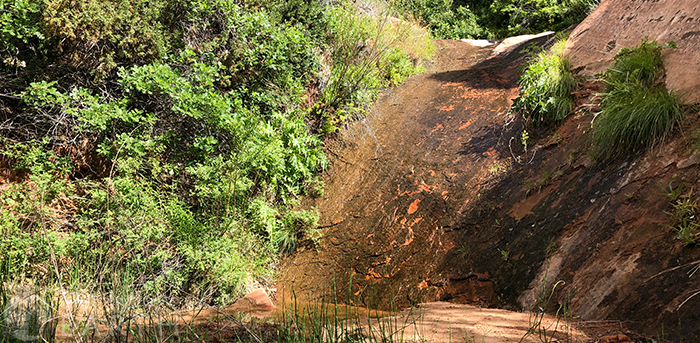
Swiss Cheese Falls
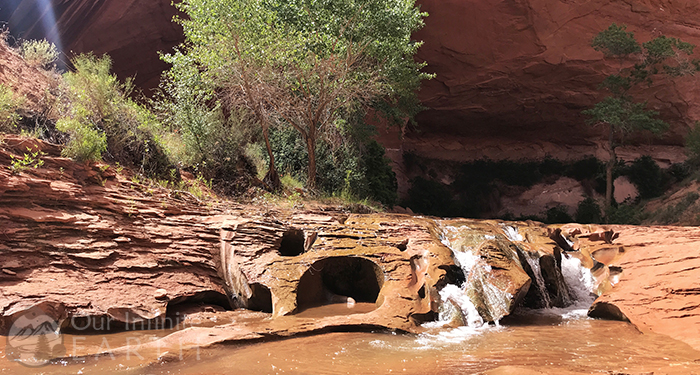
Approximately 1.2mi from Jacob Hamlin Arch as you are entering the canyon from Hurricane Wash. This is a small, but interesting waterfall due to the cool rock formations that it’s cascading over. The sandstone as been worn down by the water causing it to look like “swiss cheese”. This waterfall is pretty easy to miss since it’s not really a “fall”. The trail on the side of the river cuts up over a hill just before the falls to bypass the bend in the river, so if you’re following the trail and not paying attention, you’ll miss it. Also, since you’re following the river downhill, the picturesque part of the falls is from the other side looking up river, so it’s not really going to look like much as you’re approaching.
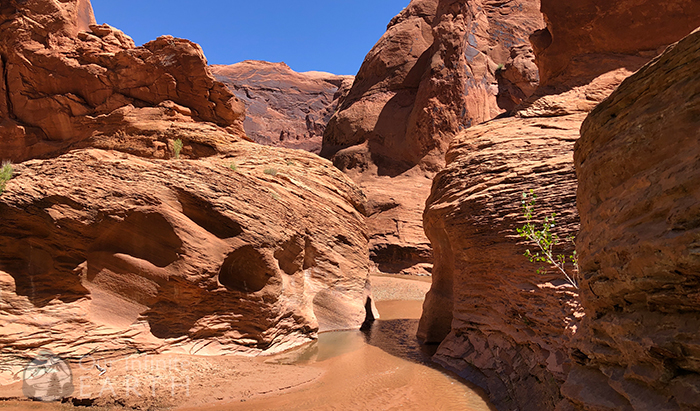
Coyote Natural Bridge
Approximately .5mi from Swiss Cheese Falls (1.7 from Jacob Hamlin Arch). A big natural bridge that crosses the river. You can’t miss it as there’s no other way to go than through it. Not nearly the size of Jacob Hamlin Arch, but it’s still really impressive and beautiful. There’s an area just past the arch (coming from Hurricane Wash) where you could camp on the side of the stream if you wanted to.
Petroglyphs
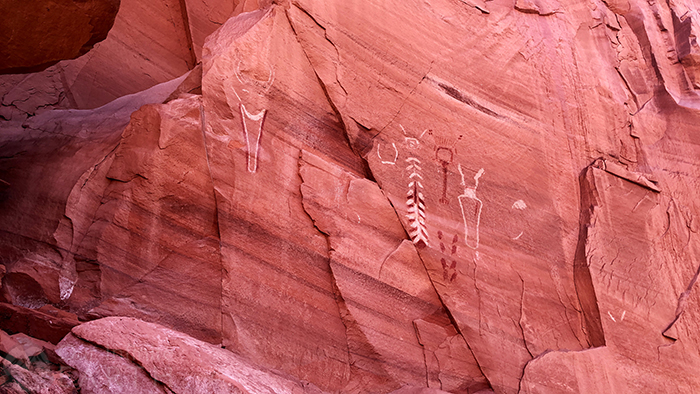
Approximately 1mi from Natural Bridge (2.7 from Jacob Hamlin Arch). Very easy to miss. There are some petroglyphs up along the edge of a canyon wall. It requires a bit of a climb up the hill side to get there. After walking through the canyon from the Natural Bridge, the trail will curve left and the canyon will open up quite a lot to a much wider area. The trail continues along the river, but the canyon walls pull away from the river. When the canyon walls start to get closer to the river again, you’ll cross a campsite under a tree where you can see a path leading out into a grassy hill without shade. This path will climb up steeply to the edge of the canyon wall, which is has lots of chunks of rocks that have fallen off the cliff. Climbing through the rocks, you’ll see the petroglyphs here on the canyon wall.
“Secret” (Not-So-Secret) Lagoon

Approximately .2mi from Petroglyphs (1.2 from Natural Bridge, 2.9 from Jacob Hamlin Arch). Just after the petroglyphs, the trail along the river continues to go towards the left and will come to another large campsite with several trees. At the far end of the campsite away from the river, a trail leads back into the trees and reeds. This is literally the next campsite after the one that’s below the petroglyphs. This is the trail to the “secret” lagoon. It’s well worn and easy to follow. You’ll likely have to cross the stream a few times by walking on some fallen trees.
The “secret” lagoon really isn’t much of a secret anymore – there’s a constant steam of people visiting it. While at one time, it might have been difficult to find, so many people now go to the lagoon that the path is really obvious.
Note: There are leeches in the lagoon! You may have seen pictures of people swimming in the lagoon (which is much colder than the stream), which is enticing on a warm day, just be aware that we saw 3 leeches hanging out near the shore when we visited in May (you can see them towards the end of our video which is at the end of this post) – not sure what it’s like during other times of the year, but I would guess that they’re always there.
Cliff Arch Falls
Approximately 1.2mi from Petroglyphs (2mi from Natural Bridge, 3.7 from Jacob Hamlin Arch). Technically this waterfall doesn’t have a name, but it was so pretty, I think it deserves one, so I’m going to call it Cliff Arch Falls since it’s so close to the Cliff Arch!
As you’re following the stream from Hurricane Wash, this area of the stream gets very rocky and much more difficult to pass. The trail pretty much disappears as you climb over the rocks and you’ll eventually find yourself on top of an approx. 10ft waterfall. To get a good look at the falls, there’s a path to the left of the falls through the “woods” that allows you to get down below. I wasn’t expecting this waterfall to be here, but it was so beautiful!
There’s also a little beach across from the falls where you can camp or just hang out and spend the day. A family was sunbathing here and enjoying this area, so I don’t have photos of it, but if you’re looking for a really pretty spot to have lunch or to spend some time, this is a really good one.
Cliff Arch
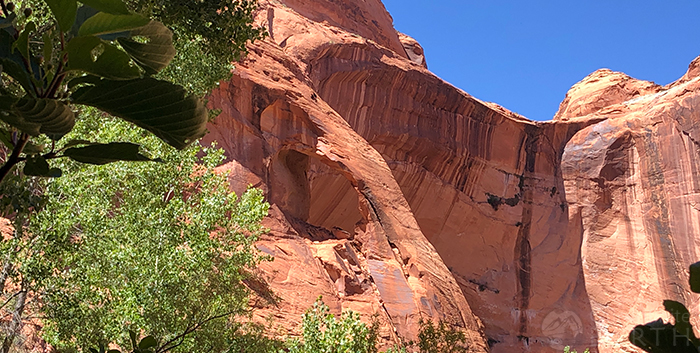
Approximately .2mi from Cliff Arch Falls (Unnamed Waterfall) (3.9 from Jacob Hamlin Arch). You can literally see the Cliff Arch from the waterfall. In fact, the best view of the arch is from the path to the left of the falls that allows you to get to the other side.
Cliff Arch looks like a giant handle of a milk jug attached to the canyon walls. It’s up high above the steam, so if you’re not looking up an paying attention you could miss it. It’s hard to get a good view of the arch since you’d need to get close to the canyon walls, which the trail doesn’t allow.
Stevens Arch
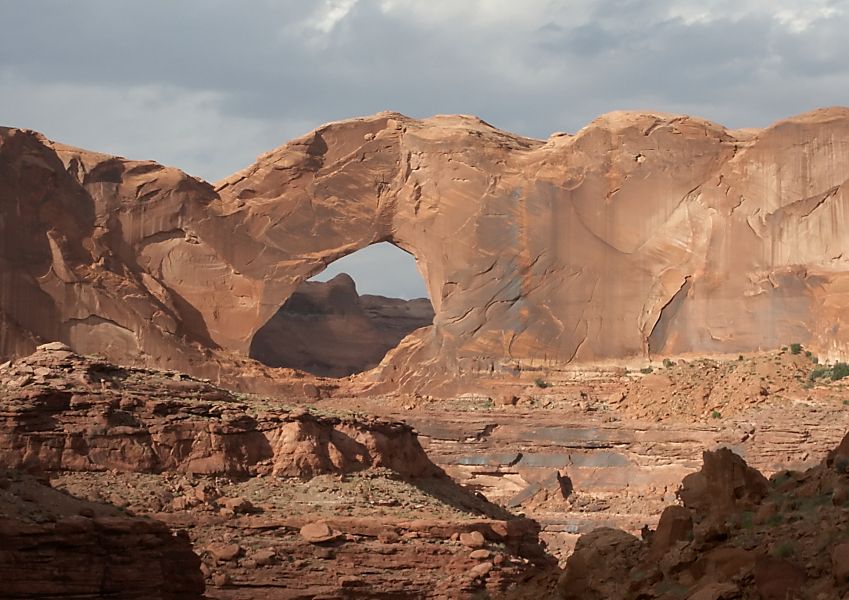
Approximately 3mi from Cliff Arch (6.9 from Jacob Hamlin Arch). The 4th largest arch in the world and one of the largest arches in the country. Stevens Arch is 160-feet tall and spans 225 feet. It’s located on the northeast side of the Escalante-Coyote Gulch confluence near a giant fin made out of sandstone. If entering from Crack in The Rock, this will be the first attraction you see, whereas it’s the last if you’re coming from Hurricane Wash.
We unfortunately didn’t have enough time to make the trek out to see this arch since it’s a good deal further than everything else in the canyon, but it looks pretty amazing from the pictures!
Campsites
You can camp pretty much anywhere in the canyon. There are lots of reliable and obvious camp sites throughout the canyon. Some of these are very large and can fit several tents.
The Hurricane Wash side of Jacob Hamblin’s Arch tends to be a little more crowded than the 6mi stretch to Steven’s Arch. A lot of backpackers will come in via Hurricane Wash, camp near the arch, and then take day packs to explore further into the Gulch. The further into the Gulch you go (closer to Steven’s Arch and also the Crack in the Wall entry point), the less crowded the campsites are.
Flash floods are a danger and you can see how high the river gets at times from the debris, which can cover most of the camp sites. Make sure to check the weather before you go to avoid getting caught in a flood.
To protect the natural resources in this area, it’s best to re-use existing campsites in Coyote Gulch – don’t worry there are plenty of them. Even over Memorial Day weekend when we went and the Visitor’s Center said they were issuing roughly 30 overnight permits per day for Coyote Gulch, there were still plenty of available spots.
The Secret Campsite
Thank you to the hiker we met at the top of the rope before coming down into the Gulch who told us about a secret campsite!
While there are lots of campsites in Coyote Gulch, most of them are along the river and are not very private as the trail along the river will basically go right through your camp.
There is one campsite however that’s in a side canyon hidden away off the path under a big rock alcove.
In attempts to keep this secret spot actually a secret (unlike the lagoon which everyone now knows about), I’m not going to give out the details of exactly where this is located. Just know that it does exist and if you have an adventurous spirit and are willing to follow the path less traveled, you should be able to find it!
Water Sources
Other than the river, which you can drink out of using a LifeStraw filter water bottle or by adding water filtration tablets to the water, there are also two natural fresh water springs in the canyon.
Neither of the fresh water springs are exactly “gushing” and it would take you a while to fill up, which is why we just drank out of the river using the purification tablets, but they do exist if you need it (you should purify them too as a precaution).
The first spring is located near Jacob Hamblin arch. As you are walking further into the canyon away from the wash, past the arch and towards the rope area entrance from the water tank route, there is a small fresh water spring just past the first bend in the river as you leave the arch on the opposite side of the river. It’s slightly hidden under a bush and is surrounded by greenery. The area between the arch and the ropes isn’t very big, so if you’re scanning the side of the river as you walk by, it’s pretty easy to see.
The second spring is pretty large and the fresh water pools at the base of the spring. This one is between Swiss Cheese Falls and The Natural Bridge, but closer to the Natural Bridge. I didn’t check the exact distance from the bridge, but again this area isn’t very big, so it’s not hard to find, especially since this spring has water cascading down the hill. It’s again across the river from the main trail, which puts it on the North side of the canyon.
What Gear To Bring
In addition to the items included in our standard backpacking gear checklist, there’s some additional gear that’s necessary for this trek, including:
Water Purification/Filters: Gravity Water Filter System or water filtration tablets
Necessary for purifying water before you drink it. There are lots of options for water that are available on this trip, just make sure to filter it first before drinking.
For Walking In The Water: Rubber Sole Mesh Water Shoes & Neoprene Socks
There were a few people walking in the river in bare feet – not sure if they weren’t prepared or just felt like it, but it’s a good idea to have water shoes for the rougher areas of the river. The neoprene socks will help to reduce blisters while also keeping your feet warm when walking in and out of the water all day. I really love the above linked water shoes – they give you the same support as a sneaker but dry almost instantly!
If Using The Water Tank or Crack In The Rock Route: 150+ Feet of Climbing Rope & Climbing Gloves
For Crack In The Rock, this is so that you can lower your pack over the edge of the rock face rather than trying to squeeze it through the crack.
Absolutely necessary for going up/down via the Water Tank. DO NOT RELY ON A ROPE TO BE THERE! Even if it is, the owner of the rope may remove it on their way out before you leave, which puts you in a tricky situation since climbing that super steep rock face without a rope is extremely difficult. The gloves are also a must! The above linked gloves are great – they’re only $10 and are SUPER grippy! Not only will they help you grip the rope which makes going up and down MUCH easier, but they will also protect your hands as you literally shove your finger tips into crevasse in the rock to pull yourself up – think Free Solo, just much less extreme!
Extra Precautionary Equipment: Harness with Ascender Clamp
If you want to be super safe when coming down/up the ropes via the Water Tank route. If you have small children on this route, these are a must (as a group who went up in front of us had for their kids). If you’re scared of heights, you might also want to consider this to make sure nothing goes wrong.
Protect Your Food: Food Storage Container
Keep your food safe from the ravens and marmot (more so the ravens) who will literally unzip and go through your pack if left unattended.
Waste Removal System: WAG bag
Required for all overnight stays. There are park rangers patrolling the bottom of the Gulch and they will ask to see your WAG bags as part of your permit.
What To Expect At Along The Trail
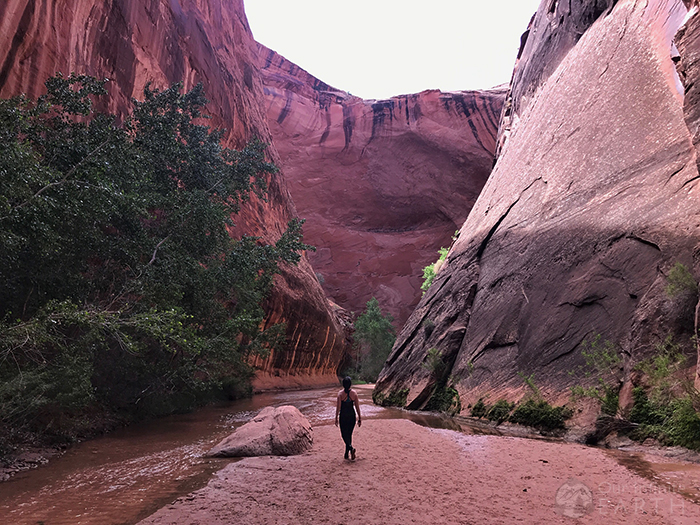
This was a super beautiful and rewarding trip. It packs a lot of visual punch for a such a short distance!
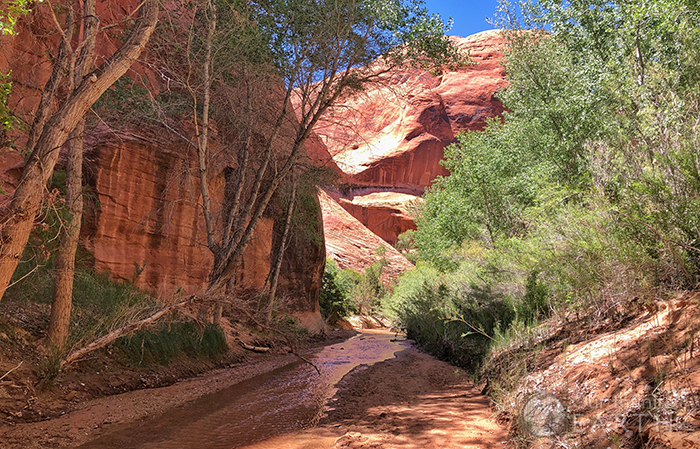
The route to the canyon are all pretty easy to follow via dirt paths or easy to see cairns along the rocks. Walking around in the canyon is pretty easy too – there are trails that go along side the stream, or you can just walk in the stream. You would really have to try to get lost down here.
The area is becoming more and more popular, so if you’re looking for solitude, this probably isn’t for you. It’s not overrun yet, but there will definitely be lots of other people in the canyon with you.
You Will Get Wet
The stream that feeds Coyote Gulch begins about one mile from the Red Well trailhead and is active year round. Regardless of your entry point, if you want to see any of the attractions in the Gulch, it will requiring stream crossings or walking in the stream – which is sometimes an easier and more direct route than the trail that winds along the sides of the river bank….. plus it’s more fun!
Since you’re going to be walking in water so much, it’s best to have water shoes and also neoprene socks. The neoprene socks will help to reduce blisters while also keeping your feet warm when walking in and out of the water. We saw several people walking in the river in bare feet, which wouldn’t be terrible since the water is pretty shallow and the bottom of the river is mostly sand and small rocks, but some sections get a little rougher, especially near Cliff Arch which could end up hurting your feet.
Food Storage
Do not feed any critters that you find in the Gulch. This can impact their ability to survive on their own when humans are not visiting.
The biggest thing to look out for are the ravens, many of which are clustered around Jacob Hamblin Arch (as this is also usually the biggest cluster of camp sites and people). They will rob unattended packs and go through your campsite if you’re not careful. They’re super smart birds and some have learned how to unzip zippers and are likely to plunder unsecured food stashes. We saw one enjoying a bag of Mint Milanos that he had dragged out of a tent. Make sure to bring a food storage container to keep your food safe.
Bugs
Bugs are an intermittent problem due to the proximity to water. They’re especially bad after a particularly wet winter or spring. July and August are worst for the bugs and are when the mosquitoes and deer flies can be really vicious. When we went in May, we were very lucky to only have a few mosquitoes bugging us, but we did also hear what sounded like a battalion of millions of mosquitoes in the waters near our campsite. Either their hum was echoing off the canyon walls or we were really lucky they didn’t find us.
Noise
This canyon echoes more so than any other canyon I’ve been in. I saw on the BLM site before going that they ask to keep your voices down in this canyon and I just thought they were being extra careful/weird about it, but no really…. sound travels like crazy in this canyon. Yes, it’s fun to yelp and hear the echo come back to you, but that yelp is going to be a disturbance to not only the other hikers who are 2-3 bends away from you, but also to the wildlife as well.
Check out this quick video with highlights of our trip: